


Interior Painting Requirements Every Homeowner Should Know
A beautiful paint job rarely starts with the paint. It starts with clean walls, the right conditions, safe prep, careful product choices, and enough time for each coat to dry properly.
That is the part many homeowners underestimate. They pick a colour, buy a few cans, and expect the room to feel finished by dinner. Sometimes that works for a small touch-up. For a full room, a kitchen, a bathroom, or a whole home, interior painting has real requirements that affect the final look, durability, odour, cleanup, and even indoor air quality.
Knowing these requirements helps whether the work is DIY or handled by a painter. It also makes quotes easier to compare because the cheapest price often skips preparation, protection, or the right primer. Those shortcuts usually show up later as peeling, blotchy colour, flashing, visible roller marks, or paint that scuffs too easily.

Start with a clear scope before buying paint
Good interior painting begins with a simple question: what exactly needs to be painted?
A room is more than four walls. The scope may include:
Walls
Ceilings
Trim and baseboards
Doors and door frames
Window casings
Closets
Built-ins
Stair risers or railings
Feature walls
Cabinets or vanities
Each surface may need a different paint, sheen, brush, roller, or preparation method. A bathroom ceiling has different requirements than a bedroom wall. A previously stained wood door needs different prep than new drywall.
Write the scope down room by room. This helps estimate paint quantity, materials, time, and labour. It also prevents the common “while we’re at it” problem, where the project grows halfway through and the schedule falls apart.
A clear scope should include colour choices, finish choices, and whether old damage needs repair before painting. If a room has nail holes, dents, stains, peeling paint, or cracked caulking, those are not minor details. They are part of the painting work.
Surface preparation is the biggest requirement
Paint does not hide everything. In many cases, it highlights flaws. A fresh coat can make dents, rough patches, and poor sanding more visible because light reflects across the new surface.
Preparation usually takes longer than painting, and that is normal. Skipping it is one of the fastest ways to get a disappointing result.
Walls must be clean and dry
Interior walls collect more residue than most people notice. Kitchens can have grease film. Bathrooms can have soap residue. Entryways may have dust, handprints, and marks from bags or coats.
Before painting, walls should be wiped down with a mild cleaner and allowed to dry fully. Areas above stoves, around light switches, and near doors usually need extra attention.
Painting over dirt or grease can cause poor adhesion. The paint may look fine at first, then peel, bubble, or rub away more easily.
Damage should be repaired before priming
Small holes and dents need patching compound. Larger damage may need drywall repair, mesh tape, or replacement sections. Once patched, the surface should be sanded smooth and dusted.
The goal is not just to fill holes. The repair must blend into the wall. A patch that is too raised, too shiny, or poorly sanded will show through the finish coat.
For best results, patched areas should be primed before painting. Otherwise, they can absorb paint differently from the rest of the wall and create dull spots.
Glossy surfaces need scuffing
Paint struggles to bond to slick surfaces. Semi-gloss trim, old oil-based coatings, varnished wood, and shiny doors often need scuff sanding before primer or paint.
This does not mean sanding down to bare wood. It means dulling the surface enough for the next coating to grip. After sanding, dust must be removed with a vacuum, tack cloth, or damp cloth.
Gaps and cracks need the right caulking
Trim often separates from walls over time, especially in homes that expand and contract through Canadian winters and humid summers. These gaps should be filled with paintable caulking.
Not every caulk can be painted. Silicone caulk, for example, often resists paint. Use a paintable acrylic latex caulk for interior trim gaps unless the product label says otherwise.
Good prep is not optional. It is the foundation of the entire paint job.
Primer is required more often than people think
Some paints are labelled as paint and primer in one. That can work on previously painted walls in good condition when the colour change is mild. It does not replace primer in every situation.
Primer has specific jobs. It seals, blocks stains, improves adhesion, and creates a consistent surface for the topcoat.
Primer is usually needed when painting:
New drywall or fresh patches
Bare wood
Unpainted trim
Stained walls or ceilings
Dark colours going light
Glossy surfaces
Smoke-damaged surfaces
Water marks, once the moisture issue is fixed
Surfaces with uneven porosity
The type of primer matters. A general drywall primer is not the same as a stain-blocking primer. A bonding primer is different again. Using the wrong primer can lead to bleed-through, peeling, or uneven sheen.
For example, if an old water stain on a ceiling has been repaired and dried, regular wall paint may not block the mark. A stain-blocking primer is often needed before the ceiling paint goes on.
Paint must match the room and surface
Choosing paint is not only about colour. The product type and sheen affect cleaning, durability, glare, and how much wall texture shows.
Sheen changes how a room looks and performs
Flat and matte finishes hide imperfections well, but they are usually less washable than shinier finishes. Eggshell and low-sheen finishes are common for walls because they balance appearance and cleanability. Satin or semi-gloss finishes are often used on trim, doors, bathrooms, kitchens, and high-touch areas.
A basic guide:
Surface or room | Common finish | Why it works |
Ceilings | Flat | Reduces glare and hides minor flaws |
Bedrooms and living rooms | Matte, eggshell, or low-sheen | Soft appearance with moderate durability |
Hallways and kids’ rooms | Eggshell or satin | Easier to clean in busy areas |
Kitchens and bathrooms | Satin or semi-gloss | Handles moisture and wiping better |
Trim and doors | Satin, semi-gloss, or gloss | Resists scuffs and stands up to contact |
The best choice also depends on the wall condition. Higher sheen reflects more light, so it can make dents and roller marks more obvious.
Colour changes may need extra coats
A dramatic colour change often needs more than two coats. Going from deep red to warm white, or from dark navy to pale beige, may require primer plus multiple finish coats.
Bold colours can also be tricky. Some rich colours use transparent pigments, which may need a tinted primer and extra coats for full coverage. This is common with intense reds, yellows, oranges, and deep blues.
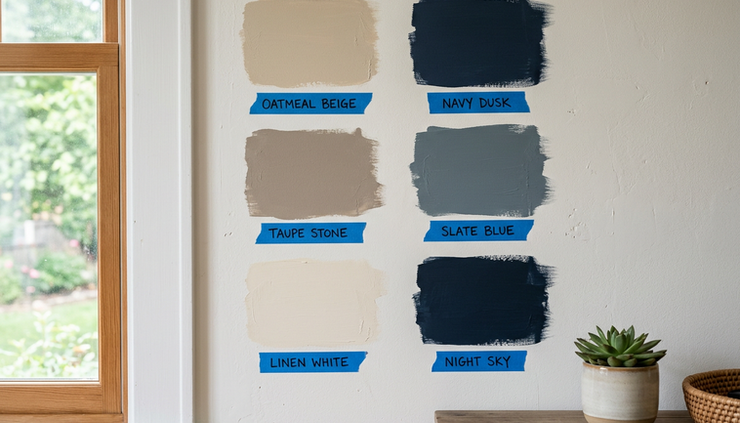
When in doubt, test a sample on the wall and view it at different times of day. Natural light, overhead lighting, and flooring can all change how a colour appears.
The room environment affects the finish
Interior paint needs the right conditions to dry and cure. Temperature, humidity, airflow, and surface moisture all matter.
Most interior paints perform best in a moderate indoor temperature range. If a room is too cold, paint can dry slowly and may not level properly. If it is too hot or too dry, paint can dry too quickly and leave lap marks. High humidity can also slow drying, which matters in bathrooms, basements, laundry rooms, and kitchens.
Ventilation is another requirement. Fresh air helps with odour and drying, but strong drafts can cause uneven drying. Open windows can help when weather allows, but in cold or humid weather, mechanical ventilation may be more reliable.
Paint also needs time between coats. The label will list recoat times, but these are based on suitable conditions. A cool basement or humid bathroom may need more time.
There is also a difference between dry and cured. Paint may feel dry within hours, but it can take much longer to fully harden. During that curing period, avoid scrubbing walls, pressing furniture against them, or hanging items that may stick to the surface.
Safety and indoor air quality should be planned
Interior painting is generally low risk when done properly, but safety still matters.
Start with ventilation. Many modern paints are low-VOC or zero-VOC, but that does not mean the room should be sealed up while painting. Open windows when conditions allow, use fans carefully, and follow the label instructions.
Protect skin and eyes when sanding, priming, or using stronger products. Dust masks or respirators may be needed during sanding, especially on older surfaces. If the home was built before lead-based paint restrictions became common, be cautious with sanding old painted surfaces. Disturbing lead paint can create hazardous dust. In that case, get proper testing and follow local safety guidance.
Ladders are another common risk. Use a stable ladder, keep it on level flooring, and avoid overreaching. A few extra moves with the ladder are safer than stretching sideways with a loaded brush.
Pets and children should be kept away from the work area until paint, tools, and open containers are cleaned up. This protects both the project and the household.
Protection and masking prevent expensive cleanup
Paint goes where gravity, wet rollers, and careless sleeves take it. A careful setup saves hours of cleanup and prevents damage to floors, furniture, fixtures, and hardware.
Before painting, remove or protect:
Outlet covers and switch plates
Curtains and blinds if they are close to the work area
Small furniture and décor
Door hardware when possible
Light fixtures or ceiling fans that are close to the surface
Rugs and fabric items that can trap dust or paint mist
Canvas drop cloths are useful for floors because they are durable and less slippery than thin plastic. Plastic sheeting works well over furniture, but it should be secured so it does not shift.
Painter’s tape can help create clean lines, but it is not magic. It must be applied to a clean, dry surface and pressed down firmly. It should also be removed at the right time, often while the paint is still slightly soft, to reduce tearing.
Tools affect the final result
Better tools make a visible difference. Cheap brushes can shed bristles, leave streaks, and make cutting in harder. Low-quality roller covers can create lint, uneven texture, or heavy stipple.
A typical interior painting setup includes:
Angled sash brush for edges and trim
Roller frame and extension pole
Roller covers suited to the wall texture
Paint tray or bucket with grid
Drop cloths
Painter’s tape
Sanding sponges or sandpaper
Putty knife and patching compound
Caulking gun and paintable caulk
Stir sticks
Clean rags
Ladder
Work light
Roller nap length matters. Smooth walls usually need a shorter nap. Heavily textured walls need a thicker nap to reach into the surface. Using the wrong roller can create poor coverage or an unwanted texture.
A work light is also helpful. Walls can look fine in soft daylight, then show missed spots at night. Lighting the wall from an angle makes flaws easier to see before the room is put back together.
Application technique matters as much as materials
Even good paint can look bad when applied poorly. Interior painting requires a steady sequence and enough wet edge control to avoid visible lines.
Most rooms follow this order:
Prepare and protect the room.
Repair, sand, clean, and prime as needed.
Paint the ceiling.
Paint the walls.
Paint trim, doors, and details.
Some painters prefer to paint trim before walls, especially when spraying or doing detailed enamel work. The right order can vary, but the key is to avoid damaging finished surfaces as the work progresses.
When painting walls, cut in along edges with a brush, then roll the nearby wall area while the brushed paint is still wet. This helps blend the texture and reduce “picture framing,” where the edges look different from the rolled sections.
Roll in manageable sections. Keep a wet edge. Avoid pressing too hard on the roller because that can leave ridges. Reload the roller before it becomes too dry.
Two thin, even coats usually look better and last longer than one heavy coat. Heavy coats can sag, dry unevenly, and show roller marks.
Drying, curing, and cleanup are part of the job
A room is not finished when the last wall is rolled. The final steps protect the result.
Check the walls in good light before cleaning up fully. Look for missed spots, roller lines, drips, and thin areas. Touch-ups are easier while the tools are still out and the paint is fresh.
Remove tape carefully. Pull it back at an angle instead of straight out from the wall. If paint has bridged over the tape, lightly score the edge with a utility knife before pulling.
Label leftover paint with the room name, colour, sheen, brand, and date. Store it in a dry, temperature-stable area where it will not freeze. In many parts of Canada, that means avoiding unheated garages or sheds during winter.
Follow local rules for paint disposal. Many communities have recycling or hazardous waste programs for leftover paint and empty cans. Do not pour paint down drains.
When professional help makes sense
DIY painting can work well for simple rooms in good condition. Professional help becomes more useful when the project involves high ceilings, stairwells, extensive drywall repairs, textured ceilings, stained surfaces, detailed trim, cabinets, or a tight timeline.
A good painting quote should clearly describe preparation, primer, number of coats, products, areas included, protection, cleanup, and exclusions. If one quote is much cheaper than the others, check what is missing. It may not include repairs, primer, trim, closets, ceilings, or adequate coats.
Ask practical questions before hiring:
What surface prep is included?
Will patched areas be primed?
How many coats are included?
What paint products will be used?
Are trim, doors, and ceilings included?
How will floors and furniture be protected?
How will touch-ups be handled?
What is the expected schedule?
The answers reveal a lot about the quality of the work.
The real requirement is doing things in the right order
Interior painting looks simple because the final step is visible. A roller on a wall feels straightforward. The hidden work matters more.
Clean the surface. Repair damage. Use primer when the surface calls for it. Choose the right sheen. Control the room conditions. Protect the space. Use good tools. Apply paint in even coats. Give it time to dry and cure.
When those requirements are met, the paint does more than change colour. It gives the room a cleaner finish, better durability, and a result that still looks good after daily life starts touching the walls again.
Comments